
Make Your Bicycle Bearings Invincible and Vastly Easier to Service
How to Install Your Own Grease Fittings so Your Bearings Vastly Outperform "Sealed" Bearings at a Fraction of the Cost
Explains why and how to install your own grease fittings so your bearings vastly outperform "sealed" bearings at a fraction of the cost.
Includes drawings and detailed procedures for adding Zerk universal grease fittings to your bicycle's headset, bottom bracket, pedals and hubs. ![]()
On this page
 |
|
I rode a bike equipped with grease fittings a foot deep in sandy salt water every day for a year as part of my research on corrosion and bearing durability. Usually a bike is scrap after one such adventure; I'm still riding this same bike thirty years later. If you know anything about machinery and salt water, you are probably having a hard time believing this statement, but I assure you it's true. |
Includes:
- Shortcomings of standard bike bearing and frame design
- Complete instructions for locating and installing grease fittings for hubs, pedals, headset, and crank bearings
- How to seal your bike frame tubes against dirt, water, and corrosion
- Types of grease
- Needed tools and materials
- All known issues and pitfalls and how to get around them
- Types of bearings; sealed mechanism, cup and cone, cartridge
If you are interested in mountain biking, touring or, commuting in environments which feature water or dirt, this article is for you.
If you ride in the rain, through creek crossings, live near the ocean, have a bicycle on your boat or in the tropics, care about low maintenance, or want your bicycle to last a hundred years, this article is really for you.
Notes: Article contains bike-specific vocabulary. Installation of grease fittings requires medium mechanical skill.
You can download files (or have them e mailed to you) immediately after processing your order.
All files have a 30 day unconditional money back guarantee. If you are not satisfied with the file for any reason, just let us know and your credit charge will be refunded in full (there is no shipping/handling for downloads).
 |
|
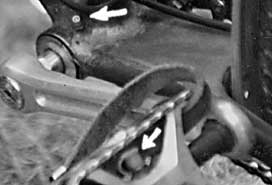
Zerk fittings on bottom bracket and pedal. |
Excerpts
How bearings exclude water, or "the truth about sealed bearings"
It is not unusual to pop the seals off a one year old, $90 pair
of “sealed” mountain bike hubs and find the ball bearings swimming
in rusty water. Bearings need grease for lubrication, to prevent rust, and to
keep out dirt and water. Every other self-respecting piece of machinery is equipped
with grease fittings. Heck, a decent wheel barrow has grease fittings —
why not bicycles?
Once installed, grease fittings (also called Zerk fittings) enable new, clean-packed
grease from a tube to be conveniently injected directly into bearings, with
no need for disassembly or tampering with their adjustment.
The dirtier and wetter the riding environment, the greater the benefit from
grease fittings. Repacking all six bearings, an otherwise expensive and involved
maintenance procedure, takes about five minutes.
Bottom bracket
Bottom brackets are the most challenging installation. In virtually all frames
the tubes drain directly into the bottom bracket. Here, at the lowest point,
crud dislodged from the sides of the seat tube joins the smaller streams of
crud from down tube and chain stays in an abrasive, oxidative attack on the
crank bearings. If the bike has an open-topped seat post and no fenders, a portion
of the gritty ditch water which flies off the tire hits the underside of the
seat and dribbles down the seat post into the crank bearings. Additionally,
the welding gas relief holes at the rear dropouts admit sandy stream crossing
water into the chainstays until they are full. Once in the frame, this sludge
has no egress save by rusting its way through the bottom bracket cup threads
and grinding its way through the ball bearings. After my first mountain bike
race, I poured a quart of water out of my frame, and later removed a tablespoon
of gravel from the bottom bracket.
If you don’t have a closed-top seat post, put a cork in the end of the
seat post. Also, put thread-locked fasteners in any unused water bottle braze-ons
to plug the holes, and solder or epoxy those nasty gas relief holes shut.
When you install a grease fitting on the crank shell, you come face to face
with this deficiency in bicycle frame design. The best approach is to squirt
a bit of oil into the frame and seal it off the tubes completely, inside and
outside.
Epoxy a 1.48 inch (3.75cm) band of beer can around the inside circumference
of the crank shell, sealing off the bottom bracket and seat tubes (see bottom
bracket figure).